Overview
This web-based Roof Pitch Calculator helps you convert and cross-check roof pitch using the most common international formats: X:12 pitch, slope ratio, angle in degrees, percent grade, “1 in N” gradient, and metric rise per meter. It also calculates practical build values like rafter factor (area multiplier), rafter length (when run/span is provided), ridge height, and a simple gable roof area estimate. The tool includes multiple input modes (tabs) so you can start from pitch, rise/run, angle/percent, or span/ridge—whatever you have on-site. A dedicated Checks tab adds material/standard guidance without changing the math, and the Print Report feature outputs a clean, professional formula + results sheet. Everything is designed to be copy-paste friendly for WordPress and to stay lightweight for fast page performance.
What Roof Pitch Means (and Why It’s Not Just a Number)
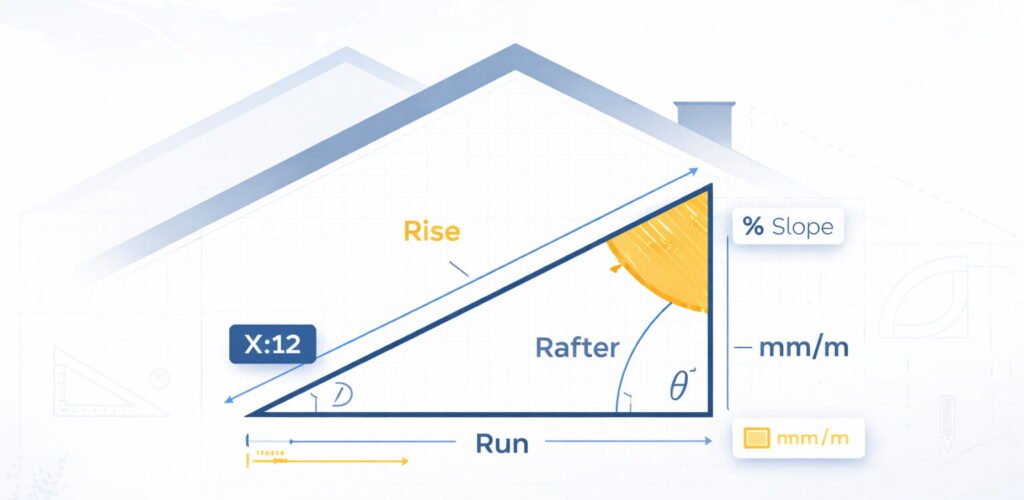
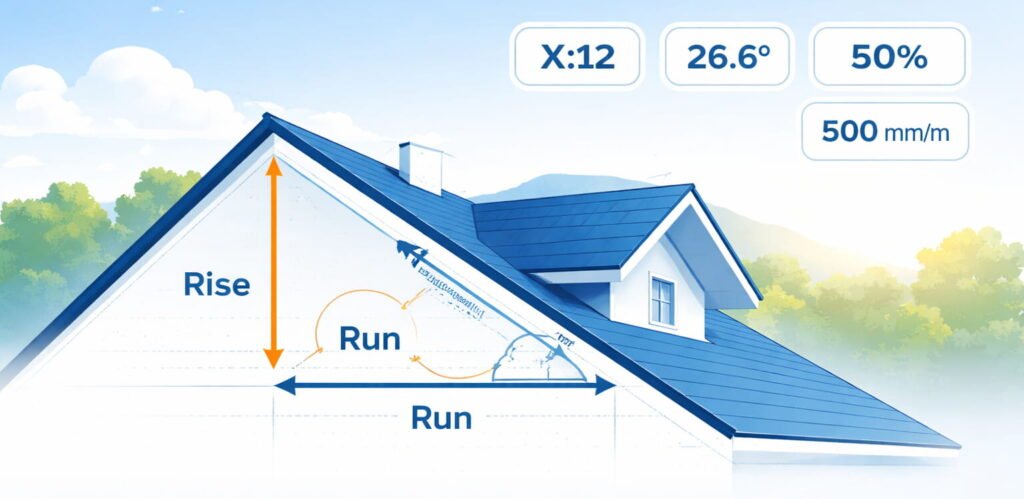
Roof pitch is a simple relationship between vertical rise and horizontal run, but it affects nearly every decision on a build—water shedding, material choice, detailing, and even safe access. Internationally, you’ll see multiple ways to express the same slope: a pitch ratio like 6:12, an angle like 26.6°, or a grade like 50%. Because different teams use different expressions (roofers, architects, civil engineers, estimators), the most useful calculator is one that translates between formats consistently. This tool focuses on clear inputs and transparent outputs so you can confirm values quickly on-site or in planning. The key idea is that all pitch formats represent the same triangle—only the language changes.
In practice, “pitch” in roofing commonly refers to rise per 12 units of run (X/12). Engineers may discuss slope as a ratio (rise/run) or as percent grade. If you’re coordinating internationally, conversions matter because a small change can shift you into a different product requirement or installation detail. This page breaks everything down into measurable parts so you can compare values without guesswork.
“A roof pitch calculator is most valuable when it makes the triangle visible: what you entered, what it implies, and how it translates into angles, lengths, and area.”
How to Use the Calculator (Tabs + Inputs)
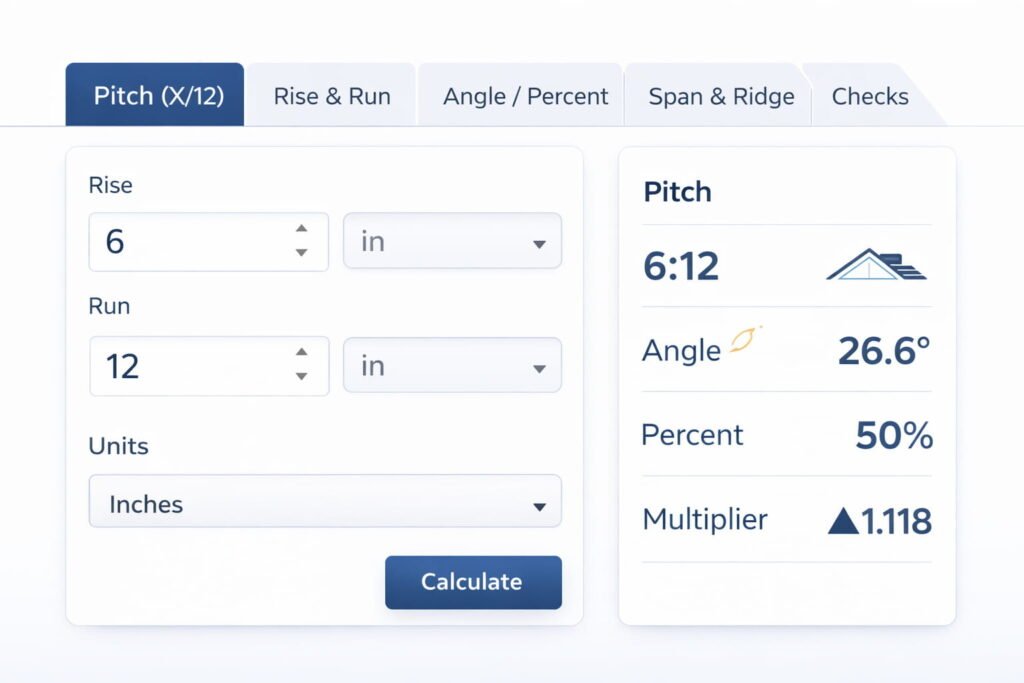
The calculator is organized into tabs so you can start from the measurement you actually have. If you only know the roof pitch from a plan (for example 6/12), use the Pitch tab. If you measured rise and run directly, use the Rise & Run tab. If you have a digital inclinometer or a drawing angle, use the Angle / Percent tab. If you’re working from building geometry, the Span & Ridge tab estimates pitch from ridge height and span (assuming a symmetric gable). The Checks tab is separate: it evaluates the last valid computed pitch and applies material/standard guidance—without altering the underlying math.
Each tab shows the formulas relevant to that input method, and the results panel updates live as you type. Optional fields (like run length or building length) unlock extra outputs such as rafter length or roof area estimates. If a value is not applicable, the tool keeps it blank instead of guessing. This makes the calculator reliable for both quick field checks and structured estimating workflows.
Tab Overview
- Pitch (X/12): Enter pitch like
6/12or6:12. Optionally add run length to compute rise and rafter length. - Rise & Run: Enter rise and run in any supported units (fractions supported). Outputs all conversions instantly.
- Angle / Percent: Enter angle in degrees or percent slope (typing one clears the other to avoid conflicts).
- Span & Ridge: Enter building span and ridge height to compute slope (assumes symmetric gable: run = span/2). Add building length to estimate roof area.
- Checks: Select material + standard to view guidance based on the last computed pitch.
Outputs You’ll Get (What the Results Mean)
The results panel is designed to speak the same language as your drawings, your site measurements, and your supplier specs. That means the tool shows the pitch in X:12 format, but also provides slope ratio (m), degrees, percent grade, and a gradient “1 in N” so you can match civil/architectural notation. On top of that, it provides practical construction outputs: the multiplier (also known as rafter factor or roof area multiplier), plus optional lengths like rafter length and ridge height. When you supply both span and building length, the calculator estimates total roof area for a simple gable roof.
If you do not enter run, span, or length, the calculator will still produce the full set of slope conversions. When you add those geometry dimensions, it unlocks lengths and area in the unit system you selected (imperial or metric). The design intentionally avoids mixing units silently; if you change unit mode, the tool updates default unit selectors to keep inputs consistent.
| Result | What it tells you | When it becomes available |
|---|---|---|
| Pitch (X:12) | Rise per 12 units of run (roofing standard). | Always (once slope is known). |
| Angle (°) | Roof angle from horizontal; useful for drawings, inclinometer readings. | Always. |
| Slope (%) | Percent grade used in engineering/civil workflows. | Always. |
| 1 in N | Gradient form: one unit vertical per N units horizontal. | Always. |
| mm/m | Metric rise per meter run; common in many international specifications. | Always. |
| Multiplier | Converts plan area to sloped area; also used to compute rafter length from run. | Always. |
| Rafter length | Sloping length (hypotenuse) based on run/span. | When run (or span) is provided. |
| Roof area (simple gable) | Total sloped area ≈ footprint × multiplier. | When span + building length are provided. |
All Formulas Used in This Tool
The calculator is built around a right-triangle model. The inputs across different tabs simply determine the slope first, then the tool derives all other formats consistently. Every formula below is shown in the same form used by the tool, and the “Formulas” panel in the calculator displays the subset that applies to the active tab. This section lists the complete formula set so you can verify results manually, audit calculations, or use them in spreadsheets and estimating workflows.
To keep formulas readable on the page without external libraries, each equation is formatted with HTML-friendly notation—fractions, square roots, and superscripts are displayed in a clear “math-like” layout. Where a formula is an identity (same value expressed differently), it’s grouped to show the relationship. If you need a pure text version for documentation, you can copy the same equations from the print report.
m =
riserunθ = arctan(m) (equivalently: m = tan(θ))% = 100 × mPitch = (12 × m) : 121 in N, where N =
1mmm/m = 1000 × mMultiplier =
(1 + m2)rise = run × mL =
(run2 + rise2)
= run × Multiplierrun = span2
and
ridge = (span/2) × mAplan = span × lengthAroof ≈ Aplan × MultiplierNote: This area estimate assumes a basic symmetric gable and does not include complex geometry such as hips/valleys, dormers, parapets, or overhang-specific surfaces unless you measure and segment them separately.
Conversion Reference Table (Common Pitches)
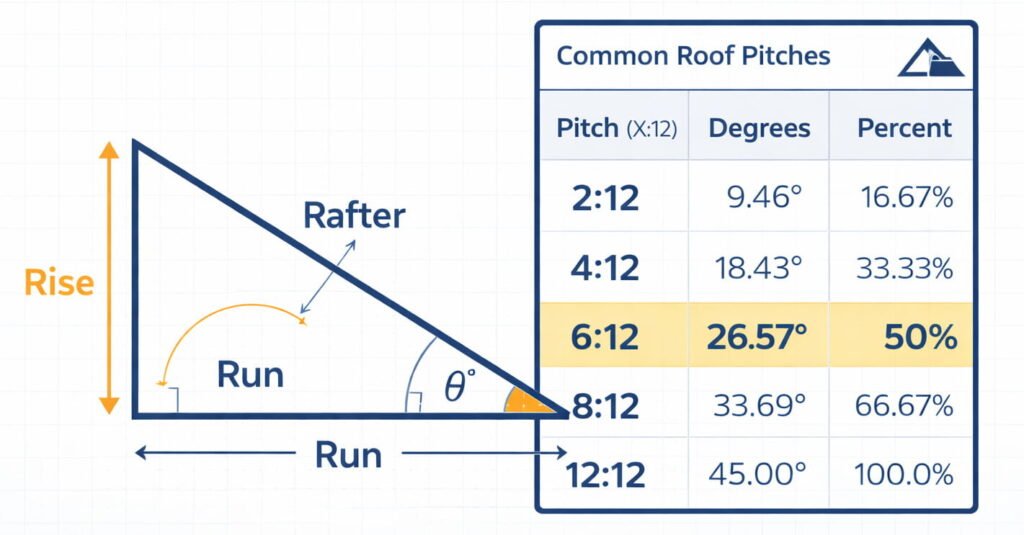
Many teams prefer a quick lookup for the most common roof pitches used in residential and light commercial work. This table provides a practical conversion between pitch (X:12), slope ratio, percent grade, and angle in degrees. Use it for quick checks before you run a full calculation, or when you want to sanity-check a site measurement. Values are rounded and may differ slightly based on decimal preferences, but the relationships remain consistent.
If you work internationally, note that pitch X:12 is a convention widely used in North America, while angle and mm/m are common in many other regions. The calculator will always produce these conversions, but a table is useful when you need a fast estimate in conversation or on a call. For precision work, rely on the calculator outputs using your chosen decimals.
| Pitch (X:12) | Slope (m = rise/run) | Percent Grade | Angle (°) | mm/m |
|---|---|---|---|---|
| 2:12 | 0.1667 | 16.67% | 9.46° | 166.7 |
| 3:12 | 0.2500 | 25.00% | 14.04° | 250.0 |
| 4:12 | 0.3333 | 33.33% | 18.43° | 333.3 |
| 5:12 | 0.4167 | 41.67% | 22.62° | 416.7 |
| 6:12 | 0.5000 | 50.00% | 26.57° | 500.0 |
| 7:12 | 0.5833 | 58.33% | 30.26° | 583.3 |
| 8:12 | 0.6667 | 66.67% | 33.69° | 666.7 |
| 9:12 | 0.7500 | 75.00% | 36.87° | 750.0 |
| 10:12 | 0.8333 | 83.33% | 39.81° | 833.3 |
| 12:12 | 1.0000 | 100.00% | 45.00° | 1000.0 |
Checks Tab (Materials & Standards) — What It Does and What It Doesn’t
The Checks tab is intentionally separated from the geometry tabs because material requirements do not “change” the pitch—your pitch is your pitch. Instead, Checks uses the last valid computed pitch from whichever input tab you used most recently, then compares that value against common guidance patterns for different roof systems. This approach keeps the tool honest: geometry stays math, while material requirements remain guidance that depends on manufacturer instructions, detailing methods, and local code amendments.
In many markets, certain roofing products are only recommended or permitted above a minimum slope, and some slopes trigger special underlayment or waterproofing requirements. The Checks tab helps you flag those conditions early, before ordering materials or finalizing details. Because code editions and product lines vary globally, the tool presents checks as “screening messages,” not as a legal guarantee. It’s a practical reminder layer to support faster decision-making.
- Material selection adjusts the screening messages (for example, asphalt shingles vs. metal panels).
- Standard selection adjusts the context label (IRC/NCC/BS/general guidance) and highlights that local amendments may apply.
- Checks never change the math—they only interpret the computed pitch.
“Use Checks as a conversation starter with the datasheet and your local code—never as a replacement for them.”
Printing a Professional Report (Formulas + Results Only)
The Print Report button is designed for real-world handoffs: client approvals, site coordination, supplier questions, and internal documentation. Instead of printing the whole page, the tool generates a single clean report layout that includes a header, key badges (pitch/angle/%), the formulas used for the current mode, and the complete results table. If you were in the Checks tab, the printed report also includes the relevant material/standard notes, so your team has context in one place.
This report layout is intentionally “eye-catching” without being noisy: it uses the brand blue and gold accents, clean card styling, and a compact table that prints well on standard paper sizes. It’s built with print-only CSS so the rest of your WordPress page remains invisible during printing. That means the output is consistent across browsers and doesn’t depend on external plugins or scripts.
- Enter your data in any input tab (Pitch / Rise & Run / Angle / Span).
- Optional: open the Checks tab and select Material + Standard if you want notes included.
- Click Print Report to print only the report section (not the full page).
Practical Field Tips (Fast, Accurate Measurements)
Roof measurements go wrong most often because teams mix units, measure along the wrong axis, or assume symmetry where it doesn’t exist. The simplest reliable method is to measure run horizontally and rise vertically, keeping the triangle model in mind. If you’re measuring on-site, a level and tape measure (or a digital level for angle) can quickly produce everything the calculator needs. The best practice is to re-check one conversion—like pitch and degrees—to catch obvious errors before you proceed.
If your roof is complex—multiple planes, dormers, hips, valleys—treat each plane as its own triangle and calculate separately. Roof area estimates are especially sensitive to geometry: the tool’s area output is a simple gable approximation unless you segment and sum. For international coordination, always confirm whether a supplier’s “minimum pitch” is expressed as degrees, percent, or an X:12 style pitch, then convert into the same format before making decisions.
- Stay consistent: rise/run must be in consistent units to avoid silent errors.
- Use one source of truth: enter the best-known measurement and let the tool compute the rest.
- For angles: use a calibrated digital inclinometer and measure on the roof plane, not on fascia trims.
- For spans: confirm the roof is symmetric before using span/2 assumptions.

FAQ
What is the difference between roof pitch and roof slope?
rise/run), while roof pitch is commonly expressed as X:12 (rise per 12 units of run). Both describe the same roof angle, just in different formats. This calculator converts pitch, slope ratio, degrees, and percent grade so you can match architectural drawings, engineering specs, and roofing product requirements.How do I convert roof pitch (X/12) to degrees?
m = X/12), then use the angle formula θ = arctan(m). For example, a 6:12 roof pitch has m = 0.5 and an angle of about 26.6°. The calculator does this instantly and shows both the roof pitch angle and percent slope.How do I convert roof pitch to percent slope (grade)?
100 × (rise/run). If your pitch is X:12, then percent grade = 100 × (X/12). For example, 6:12 equals 50% slope. This tool also outputs mm/m for metric-friendly specifications.What is the minimum roof pitch for asphalt shingles or a low-slope roof?
How is rafter length calculated from roof pitch?
√(1 + m²). Rafter length can be estimated as run × multiplier. If you provide run (or span/2 for a symmetric gable), the tool calculates rafter length in both imperial and metric units.Can this calculator estimate roof area for roofing material takeoff?
(span × length) × multiplier. For complex roofs (hips, valleys, dormers), you should break the roof into planes and sum areas for a more accurate roofing estimate.What’s the fastest way to measure roof pitch on-site?
Disclaimer (Important)
This calculator provides mathematical conversions and estimates based on a right-triangle model. Material and standard “checks” are presented as general screening guidance and may not reflect the specific requirements of your local jurisdiction, current code edition, manufacturer installation manual, climate exposure conditions, or project detailing. Always verify minimum slope requirements and underlayment/waterproofing rules using current manufacturer documentation and locally applicable regulations. Use professional judgment for safety and compliance on active job sites.